Fix 'Cannot Find the Specified File' Error When Renaming or Moving Folders in Windows 10/8/7
There are four ways to fix the "Can't Find the Specified File" error when renaming or moving a folder in Windows 10/8/7. The solutions include checking the folder path, checking for any file system issues, running the built-in System File Checker (SFC) tool, and using the Command Prompt to rename the folder. Detailed steps for each solution are available for full instructions.
| Workable Solutions | Step-by-step Troubleshooting |
|---|---|
| Fix 1. Locate missing files | The quickest way is to find, locate and place the missing files back to the original location if you...Full steps |
| Fix 2. Change user profile | When the computer cannot locate exact files or folders, you can try to change a user profile...Full steps |
| Fix 3. Run PowerShell | To start PowerShell with administrator privileges, press the Windows key and type "PowerShell" in the search bar. Right-click on the PowerShell icon and select "Run as administrator"...Full steps |
| Fix 4. Change registry | Press Windows + R and enter regedit, hit Enter or click OK. Navigate to: HKEY_LOCAL_...Full steps |
Folder renaming/moving error: cannot find the specified file! Help!
If you're experiencing an issue where renaming a file or folder on your D: drive triggers a warning that it doesn't exist, you're not alone. This error often occurs when the file path is too long, the file is hidden, or system files have become corrupted. You can try searching for the file using Windows Search, checking the folder's properties, or using a file recovery tool to resolve the issue.
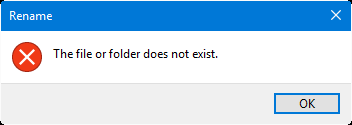
If your Windows PC says it cannot find the specified files when trying to rename or move a folder, try restarting your PC, running a System File Checker (SFC) scan, or performing a DISM scan to repair corrupted system files. Additionally, checking for malware or viruses that might be causing the issue is also recommended.
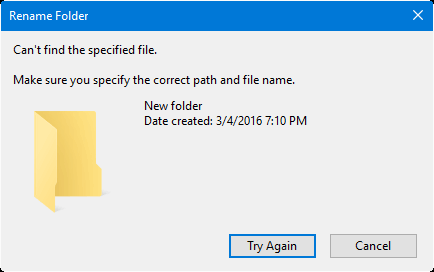
If you're experiencing issues with renaming or moving files or folders on your storage devices or PC, don't worry. Effective solutions are available to help resolve the problem right away.
To resolve the 'cannot find the specified file' error on your PC or storage devices, start by checking that the file path is correct. Sometimes, the file may be hidden or located in a different folder than expected.
Method 1. Locate and place the missing files back to the original location
If the system warns you that 'The file or folder does not exist' or "can't find the specified file" on your PC or storage devices when trying to rename or move a file or folder, it's likely that the file or folder has been moved to another location or deleted from your device.
If you're unable to rename or move a file folder because you can't find the specified files, the quickest way is to locate and place the missing files back to their original location. If you can't find the files, try following these tips for help.
Tip 1. Search and locate the exact missing files
- 1. Right-click on the Windows icon or Start icon, click Search.
- To search for a specific file or folder, type its name in the search box and press Enter. This will display a list of results, including the file or folder you're looking for, along with other relevant items that match your search query. You can also use specific keywords or phrases to narrow down the search results and find the exact file or folder you need.
- To resolve the issue, double-click to locate the missing files or folder on your PC, and then copy them back to the original folder which you need to rename on your PC or storage device.
- After the bug fix, you should be able to rename or move files/folders without any issues, as the problem that prevented this functionality has been resolved.
Tip 2. Restore lost/missing files/folder
If you can't find missing files or folders on your computer using the search function, you may need to use data recovery software like Deep Data Recovery to find and restore them.
Step 1. Launch Deep Data Recovery in Windows 11/10/8/7. Click "Fast Scan" to start the recovery process.
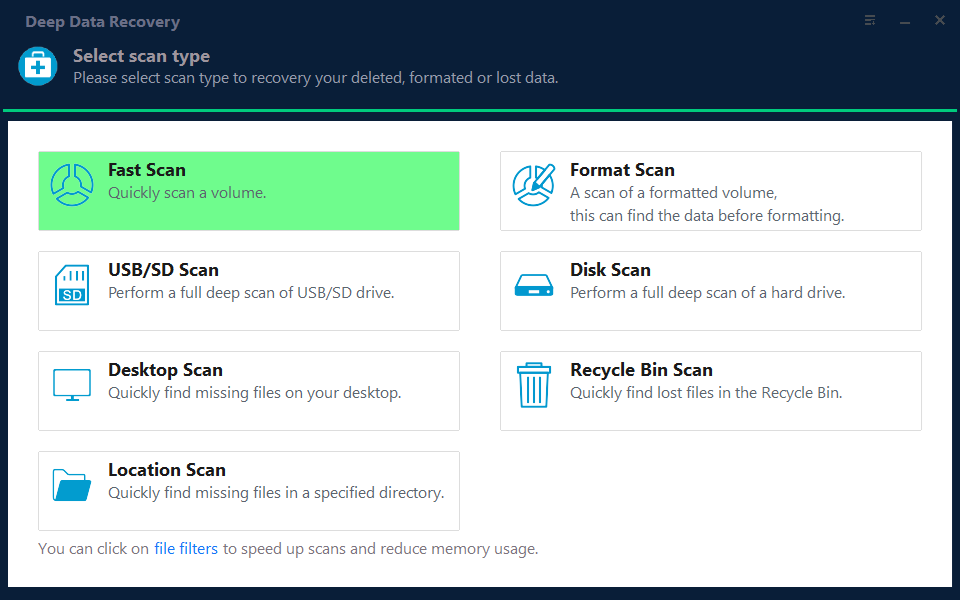
Note: You can choose different search modes based on where and why the data was lost.
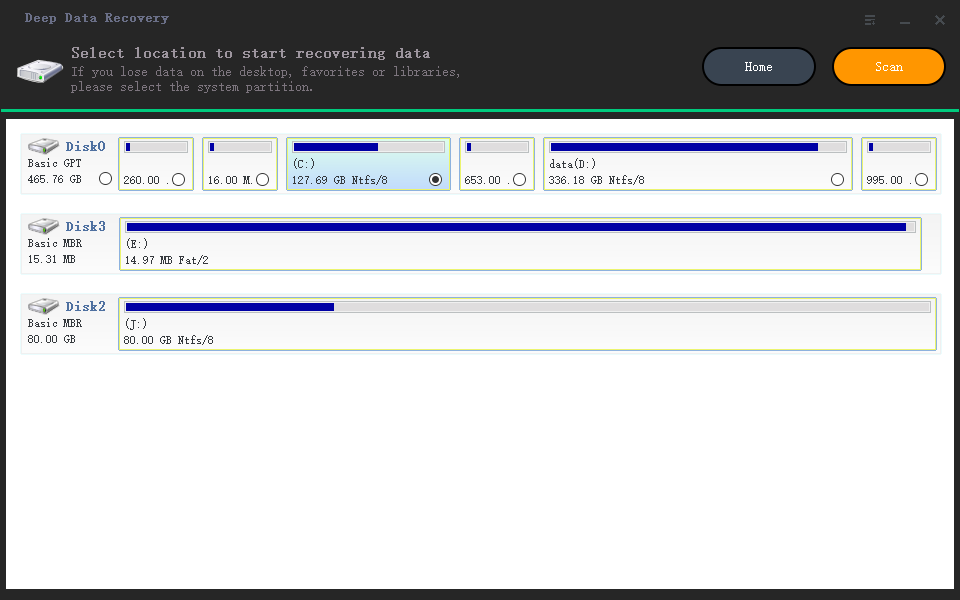
Step 2. Choose the place where you lost data. Then, click "Scan".
Step 3. After the scan, use the file format filter to find the files you need, and then click the "Preview" button or double-click a file to preview its content.
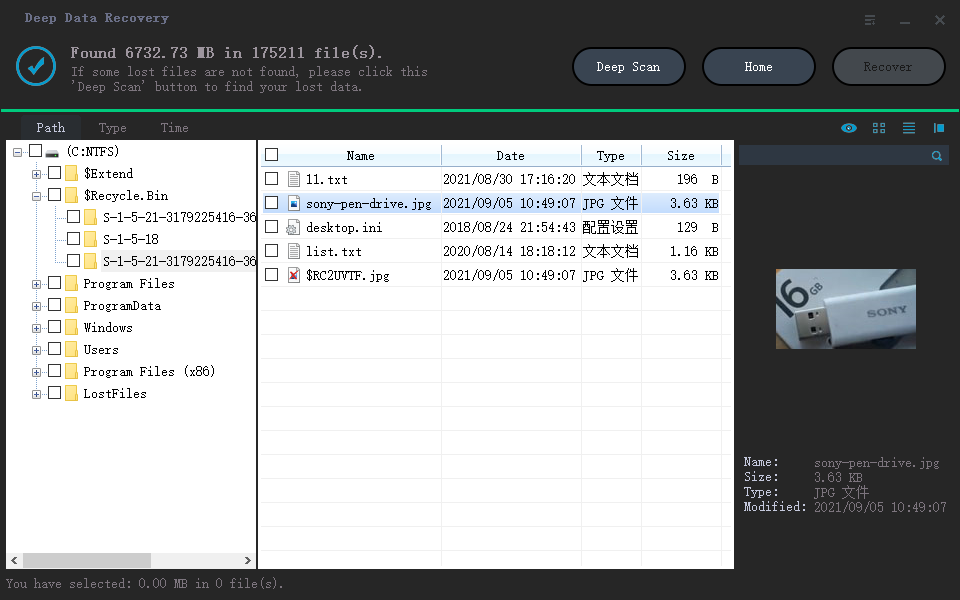
Step 4. Click the checkbox next to the file and click "Recover" to retrieve the lost data to a secure location.
Once the folder is empty, you can remove it from the temporary location and place the original folder back in its original location. Then you can rename the original folder again.
Method 2. Change User Profile to Fix 'Can't find the specified file' error
Sometimes, when the computer cannot locate exact files or folders, you can try to change a user profile or create a new user profile to see if you can locate and find the missing files/folder on your device or computer.
If you have another user profile, log out and sign in with the other user profile to your computer to see if you can locate the missing files or folder. This can help you determine if the issue is specific to your current user profile or a broader problem with your computer.
To create a new user account and log in to find the specified files, follow these tips:
Step 1. Enable Administrator Account and create a new Account
1. Right-click Start and select Command Prompt (Admin);
2. Type: net user administrator /active: yes and hit Enter;
3. When reversing the feature using the same command, switch "yes" to "no".
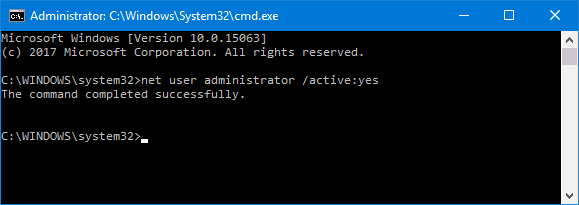
4. To enable the hidden administrator account, go to the Start menu, type "net user administrator /active:yes" in the search bar, and press Enter. This will activate the hidden administrator account.
Step 2. Create a new Account - new user profile account
1. Go to Settings > Accounts > Family & other users;
2. To add someone else to your PC, click on the Add someone else to this PC option and follow the on-screen instructions to complete the process.
3. If you want to create a local account instead of a Microsoft one, click the option that says "I don't have this person's sign-in information" and then select "Add a user without a Microsoft account".
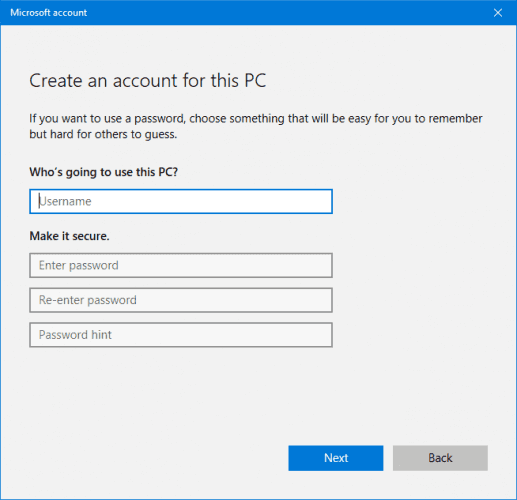
Step 3. Sign in with your new account and find missing files.
Method 3. Run Powershell to remove 'Can't find the specified file' error to rename file folder
- 1. To open PowerShell as an administrator, press the Windows key, type "Powershell" in the search bar, and then right-click on the result. From the context menu, select "Open as administrator".
- 2. Type the following command in Powershell and hit enter:
- Get-AppXPackage -AllUsers | Where-Object {$_.InstallLocation -like "*SystemApps*"} | Foreach {Add-AppxPackage -DisableDevelopmentMode -Register "$($_.InstallLocation)\AppXManifest.xml"}
Method 4. Change Registry to remove 'Can't find specified file' error
Before making changes to the Registry, it's recommended to export and backup the Registry files in case of unexpected issues or errors. This precautionary step helps prevent potential problems by saving a copy of the original Registry settings, allowing for a quick recovery if needed.
- 1. Press Windows + R and enter: regedit, hit Enter or click OK.
- 2. To access the RunOnce registry key, navigate to HKEY_LOCAL_MACHINE\SOFTWARE\Microsoft\Windows\CurrentVersion and expand the folder. If the RunOnce key is not available, create a new one by right-clicking on CurrentVersion, selecting "New", and then choosing "Key".
- 3. To create a new key, rename the existing key to RunOnce and navigate to HKEY_CURRENT_USER\Software\Microsoft\Windows\CurrentVersion\. Expand the key to see if RunOnce is available; if not, repeat the process to create a new one.
- 4. Close Registry and restart your PC.
Related Articles
- 5 Ways | How to Increase Phone Memory to Fix Insufficient Storage Error
- How to Recover Unsaved/Lost/Corrupted Adobe Acrobat Files on Windows PC
- Recover Not Showing Up/Disappeared User Folder and Files in Windows 10
- External Hard Drive Takes Forever to Load
- How to Fix Windows Startup Repair Infinite Loop
7 fixes for Windows startup repair infinite loop in Windows 7, 8, 8.1, and 10. Fix boot loops with Safe Mode, CHKDSK, Bootrec, System Restore, and more. - How to Fix Windows 10 Installation Has Failed [SOLVED]
If your Adobe software crashed and you didn't save the PDF files you are editing, you can try to recover unsaved Adobe Acrobat files as well as lost PDF files.
Products
Articles & Tutorials
- Data Recovery
- Data Backup
- File Recovery
- File Backup
- System Backup and Restore
- Disk and Partition Clone
- Technical articles
- Mobile articles
- Disk Master Help
- Windows Data Recovery Tutorials
- Windows Secure Delete Tutorials
- Windows Partition Management Tutorials
- Windows File Backup and Restore Tutorials
- Windows System Backup and Restore Tutorials
- Windows Disk Backup and Restore Tutorials
- Windows Clone Tutorials