Media Storage on Android: Can You Disable Data in Media Storage
What Is Media Storage on Android
Media Storage is a system process that is needed when viewing, downloading, playing, and streaming media files, and is accessed from the phone's Settings app, not from the desktop.
Step 1. Go to "Settings" > "Apps".
Step 2.To view system processes, click the "More (three dots)" button and select "Show system processes" from the options, which may vary slightly depending on your phone model.
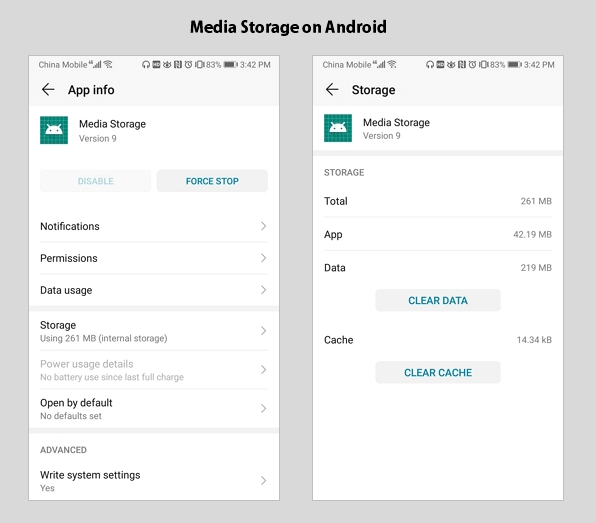
Step 3. After opening "Media Storage", several options appear, including Disable and Force Stop. Clicking on "Storage" reveals Clear Data and Clear Cache as additional options.
Some users try to disable Media Storage or clear its data to free up space or save battery, but this can cause issues with their device's functionality or loss of files, including photos, videos, or audio files. This is because Media Storage is a system app that manages media files on Android devices, and disabling or clearing its data can lead to problems with media file access and management. Therefore, it is not recommended to disable Media Storage or clear its data, as this can cause more harm than good. Instead, users should consider other methods to free up space or save battery, such as deleting unnecessary files, using cloud storage, or adjusting device settings.
Frequently Asked Questions About Media Storage on Android
Many users feel confused about the options in Media Storage, here we will explain some of them in detail.
1. Can You Disable Media Storage?
You can't disable Media Storage because it's necessary for various media-related activities on your device, such as viewing photos/videos, playing videos/music, and taking photos. Disabling it would prevent you from performing these tasks, so it's not possible to disable Media Storage to extend your device's battery life.
2. How to Enable Media Storage on Android?
To enable Media Storage on your Android phone, go to Settings > Security & location > Other security settings > Media storage. Toggle the switch to the right to enable it.
To enable Media Storage on Android:
Step 1: Go to "Settings" > "Apps" (> "Apps").
Step 2: To view system processes, click the three dots in the top-right corner of the Task Manager and select "Show system processes" from the dropdown menu. This will display a list of processes that are running in the background, including system processes that are not visible by default.
Step 3: You can search for "Media Storage" and click the option.
Step 4: Click "Enable" to re-enable the service.
3. Will Clear Data Remove Your Media Files?
When you click "Clear Data" in Media Storage, all app data, including files, settings, and accounts, will be deleted permanently, but media files like photos and videos will remain intact. If media files are missing, check if Media Storage is enabled.
How to Recover Deleted Media Storage Data on Android?
If you've accidentally deleted your media files under Media Storage, don't panic - you still have a chance to recover them. To do so, try the following methods one by one:
Method 1: Restart Your Android Device
If you're trying to retrieve all your sounds, simply restarting your phone will restore all your ringtones and gallery pictures. This is because the Android OS reverts to its original state, including restoring metadata, during the restart.
Method 2: Sync Lost Data from Your Google Account
To resolve the issue, go to your device's settings, then select "Applications" followed by "Accounts" and finally "Google account". Uncheck the boxes for syncing and then recheck them. This will resync the cleared data and restore it to Media Storage.
Method 3: Find Cleared data in lost.dir folder
If rebooting your Android device doesn't help you recover lost data, try searching for the lost.dir folder, where you may be able to find the lost files.
Method 4: Download Android data recovery software
If you're unable to locate your lost media files using the methods mentioned, it's time to use the best Android data recovery software to recover deleted files from media storage.
Option 1: Recover Lost Files from Android SD Card
If the lost files are saved on your Android SD card, you can use the hard drive recovery software - Deep Data Recovery to recover them.
Step 1. To recover data from your memory card, connect it to your computer and launch Qiling memory card recovery software. Select the file types you want to recover and click "Next" to begin the process.

Step 2. To recover lost data from an SD card, go to the Devices section, select the SD card, and click "Scan" to initiate the recovery process.

Step 3. The software automatically starts a powerful scan that can find all lost files, including those with lost file names. After the scanning process, you can view deleted items in the tree-view panel on the left. If you're looking for a specific file type, such as photos, documents, videos, or emails, you can click "Filter" to narrow down the search.

Step 4. You can directly double-click the files to preview the content. Then, choose the wanted files and click "Recover" to restore them to a secure location on your PC or other external storage devices.
Option 2: Recover Lost Files from Android Internal Storage
To recover lost photos, videos, or songs from an Android phone's internal storage, you'll need the Android data recovery software Qiling MobiSaver, provided the phone has been rooted.
Step 1. Connect your Android phone to the computer
Install and run Qiling MobiSaver for Android on your computer, then connect your Android phone to the computer with a USB cable. Click the "Start" button to make the software recognize and connect your device.
Step 2. Scan Android phone to find the lost data
After connecting your Android phone, the software quickly scans the device to find all existing and lost data, allowing you to easily find and recover the lost files you want by choosing the correct file types.
Step 3. Preview and recover data from Android phone
To recover files, preview all the recoverable files and quickly select the items you want to recover. Once you've made your selection, click the "Recover" button to get the chosen files back.
The Bottom Line
To prevent disabling system processes like Media Storage, you can hide them via Settings on your Android device, ensuring essential processes remain active for tasks such as cleaning up your phone or saving battery life.
Related Articles
- How to Disable BitLocker Encryption ( & BitLocker Service) in Windows 10 | Qiling Data Recovery Tips
- 2022 Unformat Freeware | Unformat Hard Disks/USB Drives with Ease
- Fix 'Pictures Won't Load from SD Card' Error in 2022 (7+ Solutions)
- All You Need to Know About a Rooted Device
- How to Remove Active Flag From Partition [Efficient Solution]
If you're looking to remove the active flag from a partition on your PC, you can do so by using the built-in Disk Management tool in Windows. To access this tool, press the Windows key + R to open the Run dialog, type “diskmgmt.msc,” and press Enter. - How to Repair Install Windows 10 in 3 Different Ways
Repairing Windows 10 installation involves reinstalling the operating system while keeping your programs, settings, and files intact. There are three common methods to do a repair install of Windows 10, which can be used to resolve various issues with the operating system. This article will guide you through the process, allowing you to choose the most suitable method for your needs.